
Memory Dumps
You just finished setting up your super-duper AWS environment..
Highly available & Fault Tolerant: check!
Backups in place: check!
MFA enforced: check!
Security Groups and NACLs: check!
CloudTrail enabled: check!
You even deserve bonus points for activating Amazon GuardDuty and putting AWS WAF & Shield in front of your CloudFront distribution and loadbalancers.
Time to lean back with a bit of smugness, while you take a sip of your well-deserved cup of coffee.
Seems like you have covered all your bases, or have you?
One often overlooked topic is security incident response.
While a lot of security incidents can (and should) be mitigated through automation,
some incidents will require manual intervention, such as information and evidence gathering during and after a successful malicious attack on one of your instances.
Effective incident response and forensics require preparation, well ahead of time.
It is critical to have your forensics and remediation tools readily available for whenever the proverbial shit hits the fan.
Documenting your investigative steps and being able to execute them swiftly, will contribute to a well-controlled, thorough and effective investigation.
In this blog post, I’d like to focus on some of the first steps you might take in your investigation:
- Building a forensics workstation and taking a memory dump of a compromised instance.
- Preparation steps and tools, both for windows and linux.
- The forensics investigation process.
- An investigation of a real memory dump.
Although some great tools are already available from Threadresponse (such as AWS_IR and Margarita Shotgun), we will build a solution ourselves, in order to gain a thorough knowledge on how the process works behind the scenes.
Creating a memory dump is something that should be done immediately, as it provides a snapshot of the memory at the time of the attack.
The dump can then be analyzed and used to build a timeline, improve security after the fact and optionally provide evidence for any follow up with law enforcement.
Tools
- Linux: LiME ( Linux Memory Extractor )
- Windows: FTK or Belkasoft Live RamCapturer
( both are free, but require registration, you get the download link in a mail ) - Volatility
Preparation Steps
Create Quarantine and Forensic Security Groups
- Forensics Security Group.
This SG will be attached to your Forensics Workstation later on.aws ec2 create-security-group --group-name ForensicsSG \ --description "Forensics SG" --vpc-id <your vpc id> \ --profile <your profile>
This will output something like this:
{
    "GroupId": "sg-22222222222222222"
}
Now we use this GroupId to add an inbound rule that allows SSH connection towards our Forensics Workstation
aws ec2 authorize-security-group-ingress --group-id sg-22222222222222222 \
--protocol tcp --port 22 --cidr <your cidr> --profile <your profile
By default , outbound everything is allowed, and in this case, that is ok, so we leave it at that.
- Quarantine Security Group
This SG will be attached to the compromised instance, to isolate it from any network, except the forensics network.aws ec2 create-security-group --group-name QuarantineSG \ --description "Quarantine SG" --vpc-id <your vpc id> \ --profile <your profile>
Output will look similar to the following:
{
    "GroupId": "sg-111111111111111111"
}
Remove all rules from outbound ( egress )
aws ec2 revoke-security-group-egress --group-id sg-11111111111111111 \
--ip-permissions '[{"IpProtocol": "-1","IpRanges": [{"CidrIp": "0.0.0.0/0"}],"Ipv6Ranges": [{"CidrIpv6": "::/0"}]}]' \
--profile <your profile>
Add rules to allow access from the Forensics Security Group
aws ec2 authorize-security-group-ingress --group-id sg-11111111111111111 \ --ip-permissions '[ {"IpProtocol":"tcp","FromPort":22,"ToPort":22,"UserIdGroupPairs":[ {"GroupId": "sg-22222222222222222","Description": "SSH access from the ForensicsSG"} ]}, {"IpProtocol":"tcp","FromPort":4444,"ToPort":4444,"UserIdGroupPairs":[ {"GroupId":"sg-22222222222222222","Description":"Access from the ForensicsSG for LiME dump over TCP"} ]}, {"IpProtocol":"tcp","FromPort":3389,"ToPort":3389,"UserIdGroupPairs":[ {"GroupId":"sg-22222222222222222","Description":"RDP access from the ForensicsSG"} ]} ]' \ --profile <your profile> - Create Isolation Functionality
Create lambda-execution-forensics-trust-policy.json file with following content:{ "Version": "2012-10-17", "Statement": [ { "Effect": "Allow", "Principal": { "Service": "lambda.amazonaws.com" }, "Action": "sts:AssumeRole" } ] }Create the Lambda Execution role, forensics-lambda-exec-role, using the policy file you just created:
aws iam create-role \
--role-name forensics-lambda-exec-role  \
--assume-role-policy-document file://lambda-execution-forensics-trust-policy.json \
--profile <your profile>
The output should look like this:
{
    "Role": {
        "AssumeRolePolicyDocument": {
            "Version": "2012-10-17",
            "Statement": [
                {
                    "Action": "sts:AssumeRole",
                    "Effect": "Allow",
                    "Principal": {
                        "Service": "lambda.amazonaws.com"
                    }
                }
            ]
        },
        "RoleId": "AROAILWIMFHDIIGTDST7I",
        "CreateDate": "2018-11-20T20:42:44Z",
        "RoleName": "forensics-lambda-exec-role",
        "Path": "/",
        "Arn": "arn:aws:iam::111111111111:role/forensics-lambda-exec-role"
    }
}
Create lambda-forensics-policy.json with following content:
{
    "Version": "2012-10-17",
    "Statement": [
        {
            "Action": [
                "logs:CreateLogStream",
                "logs:PutLogEvents",
                "logs:CreateLogGroup"
            ],
            "Resource": "arn:aws:logs:*:*:*",
            "Effect": "Allow"
        },
        {
            "Action": [
                "ec2:Describe*",
                "ec2:ModifyNetworkInterfaceAttribute",
                "ec2:ModifyInstanceAttribute"
            ],
            "Resource": "*",
            "Effect": "Allow"
        }
    ]
}
Create the policy:
aws iam create-policy --policy-name lambda-execute-forensics-policy \
--policy-document file://lambda-forensics-policy.json
--profile <your profile>
This will output something like this:
{
    "Policy": {
        "PolicyName": "lambda-execute-forensics-policy",
        "PermissionsBoundaryUsageCount": 0,
        "CreateDate": "2018-11-20T20:56:04Z",
        "AttachmentCount": 0,
        "IsAttachable": true,
        "PolicyId": "ANPAIG23L72JCRWAQQEFE",
        "DefaultVersionId": "v1",
        "Path": "/",
        "Arn": "arn:aws:iam::111111111111:policy/lambda-execute-forensics-policy",
        "UpdateDate": "2018-11-20T20:56:04Z"
    }
}
Attach the policy to the forensics-lambda-exec-role, using the ARN found in the output from the previous comand
aws iam attach-role-policy --role-name forensics-lambda-exec-role \
--policy-arn arn:aws:iam::111111111111:policy/lambda-execute-forensics-policy \
--profile <your profile>
Create index.py with following content:
import json
import boto3
import os

ec2 = boto3.resource('ec2')
quarantine_sg = os.environ['QUARANTINE_SG']

def set_SecurityGroup(instance):
  oldsecuritygroups = {}
  interfaces = instance.network_interfaces
  for interface in interfaces:
    oldsecuritygroups[interface.id] =  interface.groups
    interface.modify_attribute(Groups = [quarantine_sg])

  return oldsecuritygroups

def lambda_handler(event, context):
  instance = ec2.Instance(event['instance_id'])
  # Remove current Security Groups
  orig_groups = set_SecurityGroup(instance)
  return {
    'statusCode': 200,
    'body': "OK",
    'replaced_sgs': orig_groups
  }
This function will replace all Security Groups on all attached network interfaces of an instance with the Quarantine Security Group we created earlier. When you discover that an instance is compromised, you can invoke this function, and it will isolate the instance. It fetches the Security Group from the environment, and takes the instance id of the compromised instance as input as json in the following format:
{
    "instance_id": "i-xxxxxxxxxxxxxxxxx"
}
The function will output the removed Security Groups so you have a reference for later on.
zip the file to index.zip
zip index.zip index.py
Create the Lambda function, using the IAM Policy ARN from the output of the role creation (forensics-lambda-exec-role)
aws lambda create-function --function-name forensics-isolate-instance \
--zip-file fileb://index.zip \
--role arn:aws:iam::111111111111:role/forensics-lambda-exec-role \
--handler index.lambda_handler --runtime python3.6 \
--environment Variables={QUARANTINE_SG=sg-11111111111111111} \
--profile <your profile>
OK, Done, now let s move on and create a forensics workstation.
Build a Forensics Workstation
- Create EC2 Instance Role for the forensics Workstation
Create ec2-forensics-trust-policy.json file with following content:{ "Version": "2012-10-17", "Statement": [ { "Effect": "Allow", "Principal": { "Service": "ec2.amazonaws.com" }, "Action": "sts:AssumeRole" } ] }Create the EC2 Instance role, ec2-forensics-role, using the Policy file you just created:
aws iam create-role --role-name ec2-forensics-role \
--assume-role-policy-document file://ec2-forensics-trust-policy.json \
--profile <your profile>
Output:
{
    "Role": {
        "AssumeRolePolicyDocument": {
            "Version": "2012-10-17",
            "Statement": [
                {
                    "Action": "sts:AssumeRole",
                    "Effect": "Allow",
                    "Principal": {
                        "Service": "ec2.amazonaws.com"
                    }
                }
            ]
        },
        "RoleId": "AROAIGXSH7RCMPCVPY4QA",
        "CreateDate": "2018-11-21T10:34:07Z",
        "RoleName": "ec2-forensics-role",
        "Path": "/",
        "Arn": "arn:aws:iam::111111111111:role/ec2-forensics-role"
    }
}
Create ec2-forensics-policy.json with following content:
{
    "Version": "2012-10-17",
    "Statement": [
        {
            "Sid": "AllowEC2InstanceEC2Forensics",
            "Effect": "Allow",
            "Action": [
                "ec2:Describe*",
                "ec2:AuthorizeSecurityGroupIngress",
                "ec2:ModifyVolumeAttribute",
                "ec2:CreateKeyPair",
                "ec2:ReportInstanceStatus",
                "ec2:ModifySnapshotAttribute",
                "ec2:RevokeSecurityGroupEgress",
                "ec2:ImportKeyPair",
                "ec2:CreateTags",
                "ec2:StopInstances",
                "ec2:RevokeSecurityGroupIngress",
                "ec2:AttachVolume",
                "ec2:ImportVolume",
                "ec2:ModifySubnetAttribute",
                "ec2:CreateSnapshot",
                "ec2:RebootInstances",
                "ec2:ImportInstance",
                "ec2:ResetSnapshotAttribute",
                "ec2:ImportSnapshot",
                "ec2:CopySnapshot",
                "ec2:CreateImage",
                "ec2:CopyImage",
                "ec2:GetLaunchTemplateData",
                "ec2:ImportImage",
                "ec2:DetachVolume",
                "ec2:CreateFlowLogs",
                "ec2:GetConsoleOutput",
                "ec2:CreateSecurityGroup",
                "ec2:CreateNetworkAcl",
                "ec2:ModifyInstanceAttribute",
                "ec2:AuthorizeSecurityGroupEgress",
                "ec2:DetachNetworkInterface",
                "ec2:CreateNetworkAclEntry"
            ],
            "Resource": "*"
        },
        {
            "Sid": "AllowEC2InstanceInvokeLambda",
            "Effect": "Allow",
            "Action": "lambda:InvokeFunction",
            "Resource": "arn:aws:lambda:eu-west-1:111111111111:function:forensics-isolate-instance"
        }
    ]
}
Create the ec2-forensics-policy IAM Policy:
aws iam create-policy --policy-name ec2-forensics-policy \
--policy-document file://ec2-forensics-policy.json \
--profile <your profile>
Attach the policy to the ec2-forensics-role, using the ARN found in the output from the previous command.
The Forensics Workstation also needs access to S3 and AWS Systems Manager, so we also include some AWS Managed Policiesaws iam attach-role-policy --role-name ec2-forensics-role \ --policy-arn arn:aws:iam::aws:policy/service-role/AmazonEC2RoleforSSM \ --profile <your profile> aws iam attach-role-policy --role-name ec2-forensics-role \ --policy-arn arn:aws:iam::aws:policy/AmazonS3FullAccess \ --profile <your profile> aws iam attach-role-policy --role-name ec2-forensics-role \ --policy-arn arn:aws:iam::111111111111:policy/ec2-forensics-policy \ --profile <your profile>
Create an Instance Profile, called ec2-forensics-profile
aws iam create-instance-profile \
--instance-profile-name ec2-forensics-profile \
--profile <your profile>
Attach the ec2-forensics-role to the ec2-forensics-profile
aws iam add-role-to-instance-profile \
--instance-profile-name ec2-forensics-profile \
--role-name ec2-forensics-role \
--profile <your profile>
- Provision the Forensics Workstation
Create user-data.txt script with following content:#!/bin/bash # Install prerequisites sudo yum -y update sudo yum install python-pip pcre-tools gcc autoconf automake libtool nc git kernel-devel libdwarf-tools pip install distorm3 pycrypto pillow openpyxl ujson pytz IPython # Install Volatility cd /home/ec2-user wget http://downloads.volatilityfoundation.org/releases/2.6/volatility-2.6.zip unzip volatility-2.6.zip mv volatility-master volatility chown -R ec2-user.ec2-user volatility # Install LiME git clone https://github.com/504ensicsLabs/LiME.git chown -R ec2-user.ec2-user LiME
Create the EC2 Instance
aws ec2 run-instances --image-id ami-09693313102a30b2c \
--count 1 --instance-type t3.micro --key-name MyKeyPair \
--security-group-ids sg-22222222222222222 \
--subnet-id subnet-33333333333333333 \
--user-data file://user-data.txt \
--tag-specifications 'ResourceType=instance,Tags=[{Key=Name,Value="My Forensics WS"}]' \
--iam-instance-profile Name=ec2-forensics-profile \
--profile <your profile>
Tip: You can now fetch the latest Amazon AMI by querying the SSM Parameter Store:
aws ssm get-parameters \
--names /aws/service/ami-amazon-linux-latest/amzn2-ami-hvm-x86_64-gp2 \
--profile <your profile>
{
    "InvalidParameters": [],
    "Parameters": [
        {
            "Name": "/aws/service/ami-amazon-linux-latest/amzn2-ami-hvm-x86_64-gp2",
            "LastModifiedDate": 1542668357.322,
            "Value": "ami-09693313102a30b2c",
            "Version": 11,
            "Type": "String",
            "ARN": "arn:aws:ssm:eu-west-1::parameter/aws/service/ami-amazon-linux-latest/amzn2-ami-hvm-x86_64-gp2"
        }
    ]
}
We now have a basic workstation.
- Create a forensic volume
We will need a volume we can attach/detach from any instance to temporarily store memory dumps and provide tools to the compromised instance.
Since we need to support both Windows and Linux, we create an exfat filesystem on it, as it is supported on all platforms.aws ec2 create-volume --availability-zone eu-west-1a \ --size 100 --volume-type gp2 --tag-specifications \ 'ResourceType=volume,Tags=[{Key=Name,Value=exFat-Forensics-Volume}]' \ --profile <your profile>This creates a 100 GB volume. You can lower the size , but make sure that it is comfortably bigger then the largest ram size on any of your instances.
Connect to the Forensics Workstation and attach the new volume ( you probably need to run aws configure to set your default region first )
aws ec2 attach-volume --device /dev/sdX \
--volume-id <volumeid> \
--instance-id $(curl http://169.254.169.254/latest/meta-data/instance-id)
Partition and format the disk
sudo fdisk /dev/sdh

Welcome to fdisk (util-linux 2.30.2).
Changes will remain in memory only, until you decide to write them.
Be careful before using the write command.

Device does not contain a recognized partition table.
Created a new DOS disklabel with disk identifier 0x601015b4.

Command (m for help): p
Disk /dev/sdh: 100 GiB, 107374182400 bytes, 209715200 sectors
Units: sectors of 1 * 512 = 512 bytes
Sector size (logical/physical): 512 bytes / 512 bytes
I/O size (minimum/optimal): 512 bytes / 512 bytes
Disklabel type: dos
Disk identifier: 0x601015b4

Command (m for help): n
Partition type
   p   primary (0 primary, 0 extended, 4 free)
   e   extended (container for logical partitions)
Select (default p): p
Partition number (1-4, default 1):
First sector (2048-209715199, default 2048):
Last sector, +sectors or +size{K,M,G,T,P} (2048-209715199, default 209715199):

Created a new partition 1 of type 'Linux' and of size 100 GiB.

Command (m for help): t
Selected partition 1
Hex code (type L to list all codes): 7
Changed type of partition 'Linux' to 'HPFS/NTFS/exFAT'.

Command (m for help): w
The partition table has been altered.
Calling ioctl() to re-read partition table.
Syncing disks.
sudo mkfs.vfat /dev/sdh1
Mounting the volume
sudo mount /dev/sdhX /mnt
Copy your local LiME and Volatility folders to the volume, to be able to compile a kernel module or create a Volatility profile on the fly, just in case.
For Windows, we copy RamCapturer or/and FTK Imager to the volume as well.Once you have all tools on the volume, unmount it, detach it and make a snapshot.
Next step, we will gather LiME kernel modules and create Volatility Profiles for instances, running in our environment.
The LiME kernel module needs to be loaded on the compromised instance
Create LiME kernel modules and Volatility Profiles
Note that you need to compile the kernel module for the EXACT kernel version , running on your instances. If you don’t patch your systems and/or have a lot of different Linux flavors, you will have a hard time maintaining the lime kernel modules and volatility profiles.
You have 2 options in obtaining a lime kernel module matching your kernel:
- threadresponse lime module repository
https://threatresponse-lime-modules.s3.amazonaws.com/
This opens an xmlfile in which the available lime modules can be found
Here is an excerpt of that xml file.<ListBucketResult xmlns="http://s3.amazonaws.com/doc/2006-03-01/"> <Name>threatresponse-lime-modules</Name> <Prefix/> <Marker/> <-- SNIP --> <Contents> <Key> modules/lime-2.6.32-131.0.15.el6.centos.plus.x86_64.ko </Key> <LastModified>2018-09-06T18:40:37.000Z</LastModified> <ETag>"93efeac2519a4c6a573601d203416098"</ETag> <Size>1098692</Size> <StorageClass>STANDARD</StorageClass> </Contents> <Contents> <Key> modules/lime-2.6.32-131.0.15.el6.centos.plus.x86_64.ko.sig </Key> <LastModified>2018-09-06T18:41:34.000Z</LastModified> <ETag>"c4d44af3b2265e55e8c23b8dc62d8828"</ETag> <Size>566</Size> <StorageClass>STANDARD</StorageClass> </Contents> ..
The reference to the kernel modules ( in the above example on line 8 ) is the s3 object key to the object.
So if your kernel is 2.6.32-131.0.15.el6, you can download it from https://threatresponse-lime-modules.s3.amazonaws.com/modules/lime-2.6.32-131.0.15.el6.centos.plus.x86_64.ko - build your own repository
If you cannot find the lime modules for kernels running in your environment, you can build your own.
Install volatility and LiME on either an existing instance, or launch a new instance of the Linux distribution for which you want to create a module and volatility profile.For Redhat/CentOS/ Amazon Linux, you can use the userdata from the Forensics Workstation (2 .Provision the Forensics Workstation)
For Debian/Ubuntu you can use this user-data content:#!/bin/bash sudo apt -y update sudo apt -y install libelf-dev libdwarf-dev dwarfdump zip make gcc cd /home/ubuntu wget http://downloads.volatilityfoundation.org/releases/2.6/volatility-2.6.zip unzip volatility.zip mv volatility-master volatility chown -R ubuntu.ubuntu volatility # Install LiME git clone https://github.com/504ensicsLabs/LiME.git chown -R ubuntu.ubuntu LiME
- Compile the LiME module
First, Make sure you have kernel headers, source and images installed on this instance.cd ~/LiME/src make
This should have created a file called lime-$(uname -r).ko
If you need to create a module for a different kernel version ( for example for an older unpatched instance ),
install the required version and change the above command to:make KVER=<kernel version>
Note that this does not require the targeted kernel version to be active
- Create Volatility Profiles
cd ~/volatility/tools/linux # change os to reflect your distro os="ubuntu" # change kernel version to the kernel version you want to compile for # do make sure this kernel is installed ( including headers, source and boot image # however, the kernel version does not need to be actively running kernel_version=$(uname -r) make KVER=${kernel_version} zip ~/${os}-${kernel_version}.zip module.dwarf /boot/System.map-${kernel_version} - Copy the lime module (.ko file) and volatility profile (.zip file) to an S3 Bucket that acts as a central repository.
- Compile the LiME module
Incident Workflow
- Logon onto the Forensics WorkStation
ssh into your Forensics Workstation in 2 terminal windows. ( Use ssh-agent, ssh-add and ssh -A) - Isolate the compromised instance
aws lambda invoke --function-name forensics-isolate-instance \ --payload '{"instance_id": "<compromised instance id>"}' /tmp/output.txt - Create a snapshot of the compromised instance
aws ec2 create-snapshot \ --volume-id <volume-id of compromised instances root volume> \ --tag-specifications \ 'ResourceType=snapshot,Tags=[{Key=Name,Value=compromised-instance-snap}]' - Attach the Forensics Volume to the compromised EC2 Instance and mount it.
On The Forensics Workstation:aws ec2 attach-volume --device /dev/sdX \ --volume-id <forensics volume id> \ --instance-id <compromised instance id>
On the compromised EC2 Instance:
Linux:
ssh into the compromised instance, fetch the kernel version and mount the volume.
We need the kernel version for the next stepsuname -r sudo mount /dev/sdX1 /mnt
Windows:
RDP into the compromised instance ( you need to setup an SSH Tunnel via the Forensics Workstation )
Mount the volume via Computer Management -> Disk Management

The new Volume is attached and identified as Disk 1 , but it is in an offline state.
Right-click on Disk 1 and select ‘Online’

The Volume is now online and mapped to D:

On Windows, you can now skip to Step 7
- In the other terminal ( Forensics WS ), fetch the lime kernel module from your S3 Bucket or the Threadresponse repository
- scp the LiME module to the compromised instance
- Run the memory dump on the compromised instance
On Linux:sudo insmod /path/to/lime-$(uname -r).ko "path=/mnt/ram.lime format=lime digest=sha1"
This will create the memory dump file ram.lime and the digest file ram.sha1 on the forensics volume.
On Windows:
Open File Explorer, and go to D:\
If RamCapturer is not yet unzipped, unzip RamCapturer.zip first.
Then run D:\RamCapturer\x64\RamCapturer.exe as Administrator
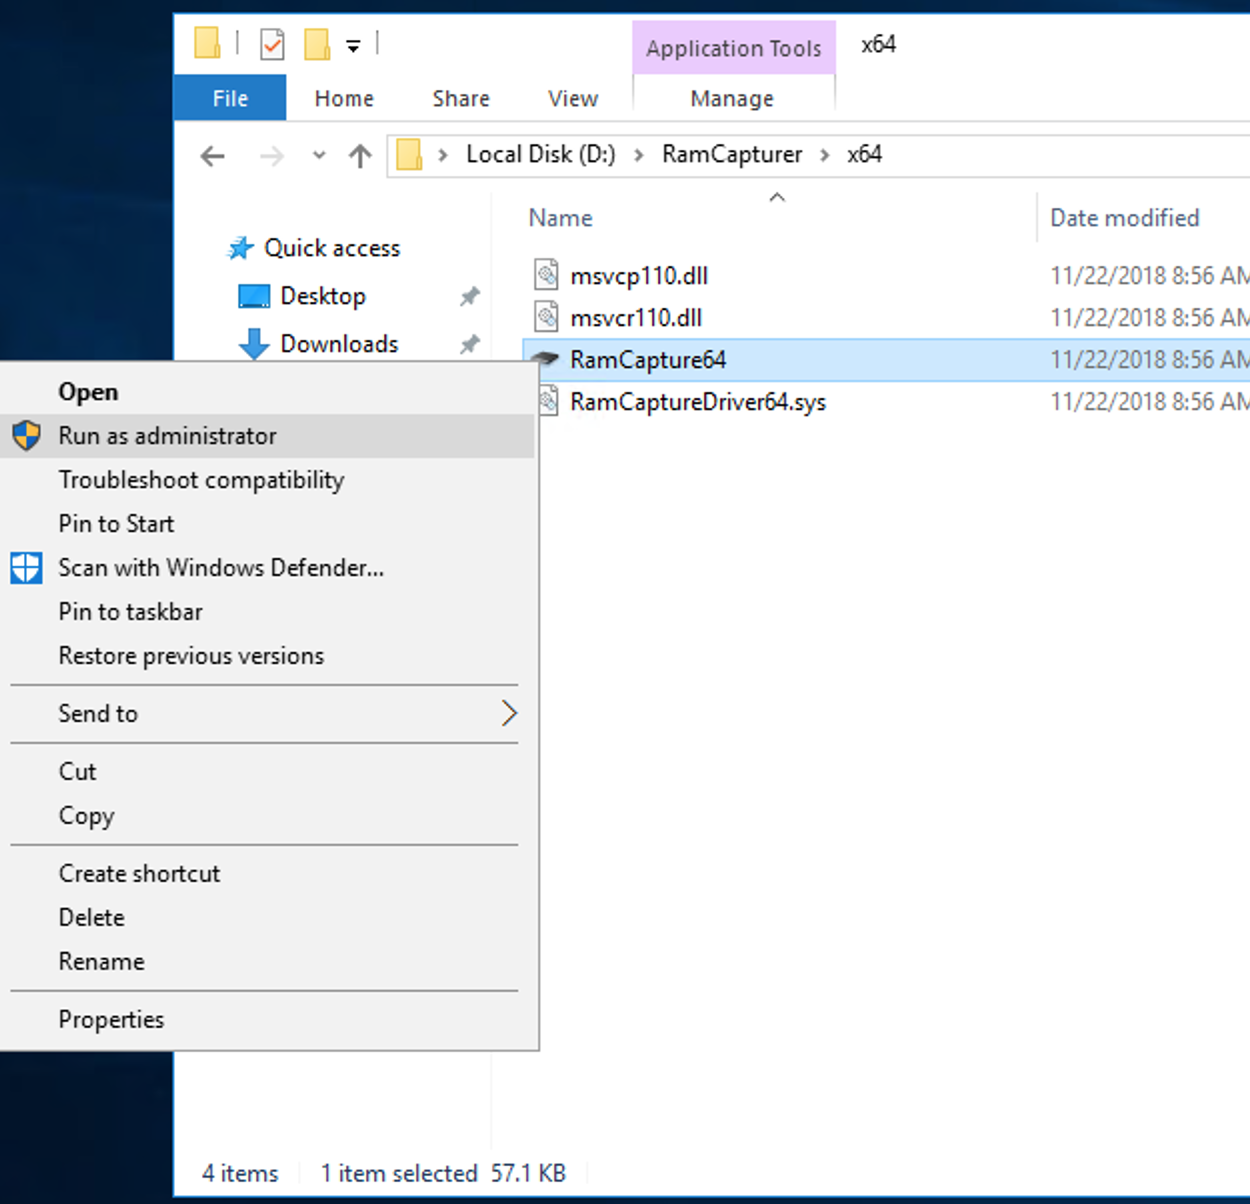

Save the dump to D:\ and run ‘Capture!’
The dump will be saved as YYYYMMDD.mem where YYYYMMDD is the current date. - Fetch the memory dump onto the Forensics WorkStation
unmount the Forensics Volume on Linux, or , on Windows, put it offline again using the Disk Management.
Detach the volume from the compromised EC2 Instance and attach it back to the Forensics Workstation. - Stop the Compromised instance.
Sample Results from Memory Dumps
Volatility requires a profile matching your kernel. For Windows this is already included , but for Linux , you might need the volatility profile to be imported into your volatility setup.
let’s first test if the profile for your kernel is already configured:
cd volatility
python vol.py --info | grep Profile
Volatility Foundation Volatility Framework 2.6
Profiles
Linuxamzn-4_14_72-73_55_amzn2_x86_64x64 - A Profile for Linux amzn-4.14.72-73.55.amzn2.x86_64 x64
Linuxamzn-4_14_77-81_59_amzn2_x86_64x64 - A Profile for Linux amzn-4.14.77-81.59.amzn2.x86_64 x64
VistaSP0x64                             - A Profile for Windows Vista SP0 x64
VistaSP0x86                             - A Profile for Windows Vista SP0 x86
VistaSP1x64                             - A Profile for Windows Vista SP1 x64
VistaSP1x86                             - A Profile for Windows Vista SP1 x86
VistaSP2x64                             - A Profile for Windows Vista SP2 x64
VistaSP2x86                             - A Profile for Windows Vista SP2 x86
Win10x64                                - A Profile for Windows 10 x64
Win10x64_10240_17770                    - A Profile for Windows 10 x64 (10.0.10240.17770 / 2018-02-10)

...
If your kernel is not listed, you can add it by copying the volatility profile ( created in section 2.2 Create Volatility Profile )
to the volatility/plugins/overlays/linux/ directory.
Rerunning the above command should show your added profile.
OK, Pièce de résistance: some results:
Fetching lsof for the linux memory dump:
python vol.py -f /mnt/ram-20181122.lime \
--profile Linuxamzn-4_14_72-73_55_amzn2_x86_64x64 linux_lsof

Volatility Foundation Volatility Framework 2.6
Offset             Name                           Pid      FD       Path
------------------ ------------------------------ -------- -------- ----
0xffff88001c628000 systemd                               1        0 /dev/null
0xffff88001c628000 systemd                               1        1 /dev/null
0xffff88001c628000 systemd                               1        2 /dev/null
0xffff88001c628000 systemd                               1        3 anon_inode:[6744]
0xffff88001c628000 systemd                               1        4 anon_inode:[6744]
0xffff88001c628000 systemd                               1        5 anon_inode:[6744]
0xffff88001c628000 systemd                               1        6 /sys/fs/cgroup/systemd
0xffff88001c628000 systemd                               1        7 anon_inode:[6744]
0xffff88001c628000 systemd                               1        8 socket:[14109]
0xffff88001c628000 systemd                               1        9 /proc/1/mountinfo

-- SNIP --

0xffff8800182525c0 sudo                              23415        3 pipe:[1758814]
0xffff8800182525c0 sudo                              23415        4 pipe:[1758814]
0xffff8800182525c0 sudo                              23415        5 socket:[1758834]
0xffff8800182525c0 sudo                              23415        6 socket:[1758839]
0xffff880018254b80 insmod                            23416        0 /dev/pts/0
0xffff880018254b80 insmod                            23416        1 /dev/pts/0
0xffff880018254b80 insmod                            23416        2 /dev/pts/0
0xffff880018254b80 insmod                            23416        3 /mnt/lime-modules/amazon/lime-4.14.72-73.55.amzn2.x86_64.ko
List all established connections on Linux
python vol.py -f /mnt/ram-20181122.lime --profile Linuxamzn-4_14_72-73_55_amzn2_x86_64x64 linux_netstat | grep EST
Volatility Foundation Volatility Framework 2.6
TCP      10.100.4.6      :   22 10.100.4.111    :44854 ESTABLISHED                  sshd/23161
TCP      10.100.4.6      :   22 10.100.4.111    :44854 ESTABLISHED                  sshd/23179
List all open ports on Linux
python vol.py -f /mnt/ram-20181122.lime --profile Linuxamzn-4_14_72-73_55_amzn2_x86_64x64 linux_netstat | grep LISTEN
Volatility Foundation Volatility Framework 2.6
TCP      0.0.0.0         :  111 0.0.0.0         :    0 LISTEN                    rpcbind/2662
TCP      ::              :  111 ::              :    0 LISTEN                    rpcbind/2662
TCP      127.0.0.1       :   25 0.0.0.0         :    0 LISTEN                     master/3143
TCP      0.0.0.0         :   22 0.0.0.0         :    0 LISTEN                       sshd/3273
TCP      ::              :   22 ::              :    0 LISTEN                       sshd/3273
List all processes on Linux
python vol.py -f /mnt/ram-20181122.lime --profile Linuxamzn-4_14_72-73_55_amzn2_x86_64x64 linux_pslist
Volatility Foundation Volatility Framework 2.6
Offset             Name                 Pid             PPid            Uid             Gid    DTB                Start Time
------------------ -------------------- --------------- --------------- --------------- ------ ------------------ ----------
0xffff88001c628000 systemd              1               0               0               0      0x000000001b014000 2018-11-15 16:22:54 UTC+0000
0xffff88001c62a5c0 kthreadd             2               0               0               0      ------------------ 2018-11-15 16:22:54 UTC+0000
0xffff88001c648000 kworker/0:0H         4               2               0               0      ------------------ 2018-11-15 16:22:54 UTC+0000
0xffff88001c64cb80 mm_percpu_wq         6               2               0               0      ------------------ 2018-11-15 16:22:54 UTC+0000
0xffff88001c690000 ksoftirqd/0          7               2               0               0      ------------------ 2018-11-15 16:22:54 UTC+0000
0xffff88001c6925c0 rcu_sched            8               2               0               0      ------------------ 2018-11-15 16:22:54 UTC+0000
0xffff88001c694b80 rcu_bh               9               2               0               0      ------------------ 2018-11-15 16:22:54 UTC+0000
0xffff88001c698000 migration/0          10              2               0               0      ------------------ 2018-11-15 16:22:54 UTC+0000
0xffff88001c69a5c0 watchdog/0           11              2               0               0      ------------------ 2018-11-15 16:22:54 UTC+0000

-- SNIP --

0xffff88000890cb80 sshd                 23161           3273            0               0      0x000000000a35c000 2018-11-22 12:56:43 UTC+0000
0xffff880019598000 sshd                 23179           23161           1000            1000   0x000000000a246000 2018-11-22 12:56:43 UTC+0000
0xffff88001679a5c0 bash                 23180           23179           1000            1000   0x0000000008990000 2018-11-22 12:56:43 UTC+0000
0xffff880017b30000 kworker/u30:0        23287           2               0               0      ------------------ 2018-11-22 12:57:16 UTC+0000
0xffff8800182525c0 sudo                 23415           23180           0               0      0x000000000a308000 2018-11-22 12:59:15 UTC+0000
0xffff880018254b80 insmod               23416           23415           0               0      0x00000000005a6000 2018-11-22 12:59:15 UTC+0000
There are other interesting possibilities , to get an idea what you can query run volatility with the -h option
python vol.py --info | grep linux_
This will list all comands, available for linux memory dumps.
Note that some commands might not work, because they are not supported for a specific profile.
Process list on Windows
volatility]$ python vol.py -f /mnt/20181122.mem  --profile Win2016x64_14393 pslist
Volatility Foundation Volatility Framework 2.6
Offset(V)          Name                    PID   PPID   Thds     Hnds   Sess  Wow64 Start                          Exit
------------------ -------------------- ------ ------ ------ -------- ------ ------ ------------------------------ ------------------------------
0xffffbf0b9de5e500 System                    4      0    144        0 ------      0 2018-11-18 23:32:48 UTC+0000
0xffffbf0b9e6ec040 smss.exe                388      4      2        0 ------      0 2018-11-18 23:32:49 UTC+0000
0xffffbf0b9e6a2080 csrss.exe               524    516      9        0      0      0 2018-11-18 23:33:00 UTC+0000
0xffffbf0b9e98f080 smss.exe                584    388      0 --------      1      0 2018-11-18 23:33:01 UTC+0000
0xffffbf0b9e9a7080 csrss.exe               592    584      9        0      1      0 2018-11-18 23:33:01 UTC+0000
0xffffbf0b9e9f3080 wininit.exe             608    516      1        0      0      0 2018-11-18 23:33:01 UTC+0000
0xffffbf0b9e9c1080 winlogon.exe            644    584      2        0      1      0 2018-11-18 23:33:01 UTC+0000
0xffffbf0b9ec7b080 services.exe            704    608      4        0      0      0 2018-11-18 23:33:01 UTC+0000
0xffffbf0b9ec81080 lsass.exe               712    608      7        0      0      0 2018-11-18 23:33:02 UTC+0000
0xffffbf0b9ecc4380 svchost.exe             784    704     16        0      0      0 2018-11-18 23:33:03 UTC+0000
0xffffbf0b9eceb840 svchost.exe             836    704     11        0      0      0 2018-11-18 23:33:03 UTC+0000

-- SNIP --

0xffffbf0b9f44e840 userinit.exe           3120   2204      0 --------      2      0 2018-11-21 22:12:45 UTC+0000
0xffffbf0b9f4d5840 explorer.exe           3136   3120     60        0      2      0 2018-11-21 22:12:45 UTC+0000
0xffffbf0b9e252840 TabTip.exe             3148    996     12        0      2      0 2018-11-21 22:12:45 UTC+0000
0xffffbf0b9f249840 TabTip32.exe           3212   3148      1        0      2      1 2018-11-21 22:12:46 UTC+0000
0xffffbf0b9f5fd840 ShellExperienc         3988    784     20        0      2      0 2018-11-21 22:12:56 UTC+0000
0xffffbf0b9f44c340 SearchUI.exe           4084    784     16        0      2      0 2018-11-21 22:12:59 UTC+0000
0xffffbf0b9f7795c0 MpCmdRun.exe           4568   4528      5        0      0      0 2018-11-21 22:13:08 UTC+0000
0xffffbf0b9f695080 WUDFHost.exe           2376    996      6        0      0      0 2018-11-22 12:05:39 UTC+0000
0xffffbf0b9f8e4840 conhost.exe            2968   3668      0 --------      2      0 2018-11-22 12:25:08 UTC+0000
0xffffbf0b9f29b840 RamCapture64.e         4004   3136      9        0      2      0 2018-11-22 12:25:46 UTC+0000
0xffffbf0b9e90a840 conhost.exe            3828   4004      9        0      2      0 2018-11-22 12:25:46 UTC+0000
Open ports on Windows
python vol.py -f /mnt/20181122.mem  --profile Win2016x64_14393 netscan | grep LISTEN
Volatility Foundation Volatility Framework 2.6
0xbf0b9ded6560     TCPv4    0.0.0.0:3389                   0.0.0.0:0            LISTENING        960      svchost.exe    2018-11-18 23:33:04 UTC+0000
0xbf0b9ded6970     TCPv4    0.0.0.0:3389                   0.0.0.0:0            LISTENING        960      svchost.exe    2018-11-18 23:33:04 UTC+0000
0xbf0b9ded6970     TCPv6    :::3389                        :::0                 LISTENING        960      svchost.exe    2018-11-18 23:33:04 UTC+0000
0xbf0b9e8e5320     TCPv4    0.0.0.0:49666                  0.0.0.0:0            LISTENING        968      svchost.exe    2018-11-18 23:33:05 UTC+0000
0xbf0b9e9bb710     TCPv4    0.0.0.0:49666                  0.0.0.0:0            LISTENING        968      svchost.exe    2018-11-18 23:33:05 UTC+0000
0xbf0b9e9bb710     TCPv6    :::49666                       :::0                 LISTENING        968      svchost.exe    2018-11-18 23:33:05 UTC+0000
0xbf0b9eb97a30     TCPv4    0.0.0.0:49667                  0.0.0.0:0            LISTENING        1580     spoolsv.exe    2018-11-18 23:33:05 UTC+0000
0xbf0b9eb97a30     TCPv6    :::49667                       :::0                 LISTENING        1580     spoolsv.exe    2018-11-18 23:33:05 UTC+0000
0xbf0b9eb988b0     TCPv4    0.0.0.0:49667                  0.0.0.0:0            LISTENING        1580     spoolsv.exe    2018-11-18 23:33:05 UTC+0000
0xbf0b9ebd9c80     TCPv4    0.0.0.0:445                    0.0.0.0:0            LISTENING        4        System         2018-11-18 23:33:05 UTC+0000
0xbf0b9ebd9c80     TCPv6    :::445                         :::0                 LISTENING        4        System         2018-11-18 23:33:05 UTC+0000
0xbf0b9ebf9010     TCPv4    0.0.0.0:5985                   0.0.0.0:0            LISTENING        4        System         2018-11-18 23:33:05 UTC+0000
0xbf0b9ebf9010     TCPv6    :::5985                        :::0                 LISTENING        4        System         2018-11-18 23:33:05 UTC+0000
0xbf0b9ec2dc00     TCPv4    0.0.0.0:47001                  0.0.0.0:0            LISTENING        4        System         2018-11-18 23:33:05 UTC+0000
0xbf0b9ec2dc00     TCPv6    :::47001                       :::0                 LISTENING        4        System         2018-11-18 23:33:05 UTC+0000
0xbf0b9ec33ec0     TCPv4    0.0.0.0:49669                  0.0.0.0:0            LISTENING        704      services.exe   2018-11-18 23:33:05 UTC+0000
0xbf0b9ec33ec0     TCPv6    :::49669                       :::0                 LISTENING        704      services.exe   2018-11-18 23:33:05 UTC+0000
0xbf0b9ec4a8c0     TCPv4    10.100.4.174:139               0.0.0.0:0            LISTENING        4        System         2018-11-18 23:33:04 UTC+0000
0xbf0b9ecf83e0     TCPv4    0.0.0.0:135                    0.0.0.0:0            LISTENING        836      svchost.exe    2018-11-18 23:33:03 UTC+0000
0xbf0b9ecfa8f0     TCPv4    0.0.0.0:135                    0.0.0.0:0            LISTENING        836      svchost.exe    2018-11-18 23:33:03 UTC+0000
0xbf0b9ecfa8f0     TCPv6    :::135                         :::0                 LISTENING        836      svchost.exe    2018-11-18 23:33:03 UTC+0000
0xbf0b9ed06ba0     TCPv4    0.0.0.0:49664                  0.0.0.0:0            LISTENING        608      wininit.exe    2018-11-18 23:33:03 UTC+0000
0xbf0b9ed07a30     TCPv4    0.0.0.0:49664                  0.0.0.0:0            LISTENING        608      wininit.exe    2018-11-18 23:33:03 UTC+0000
0xbf0b9ed07a30     TCPv6    :::49664                       :::0                 LISTENING        608      wininit.exe    2018-11-18 23:33:03 UTC+0000
0xbf0b9edd0c00     TCPv4    0.0.0.0:49665                  0.0.0.0:0            LISTENING        528      svchost.exe    2018-11-18 23:33:04 UTC+0000
0xbf0b9edd2a30     TCPv4    0.0.0.0:49665                  0.0.0.0:0            LISTENING        528      svchost.exe    2018-11-18 23:33:04 UTC+0000
0xbf0b9edd2a30     TCPv6    :::49665                       :::0                 LISTENING        528      svchost.exe    2018-11-18 23:33:04 UTC+0000
0xbf0b9ee908b0     TCPv4    0.0.0.0:49669                  0.0.0.0:0            LISTENING        704      services.exe   2018-11-18 23:33:05 UTC+0000
0xbf0b9f00ec40     TCPv4    0.0.0.0:49671                  0.0.0.0:0            LISTENING        712      lsass.exe      2018-11-18 23:33:13 UTC+0000
0xbf0b9f116c70     TCPv4    0.0.0.0:49671                  0.0.0.0:0            LISTENING        712      lsass.exe      2018-11-18 23:33:13 UTC+0000
0xbf0b9f116c70     TCPv6    :::49671                       :::0                 LISTENING        712      lsass.exe      2018-11-18 23:33:13 UTC+0000
0xd200000d6560     TCPv4    0.0.0.0:3389                   0.0.0.0:0            LISTENING        960      svchost.exe    2018-11-18 23:33:04 UTC+0000
0xd200000d6970     TCPv4    0.0.0.0:3389                   0.0.0.0:0            LISTENING        960      svchost.exe    2018-11-18 23:33:04 UTC+0000
0xd200000d6970     TCPv6    :::3389                        :::0                 LISTENING        960      svchost.exe    2018-11-18 23:33:04 UTC+0000
Established connections on Windows
 python vol.py -f /mnt/20181122.mem  --profile Win2016x64_14393 netscan | grep EST
Volatility Foundation Volatility Framework 2.6
0xbf0b9f385d00     TCPv4    10.100.4.174:3389              94.143.189.241:35347 ESTABLISHED      960      svchost.exe    2018-11-22 11:46:20 UTC+0000
A whole range of other commands are supported, but remember, not all commands work under all circumstances, YMMV.
Now where is that coffee?
